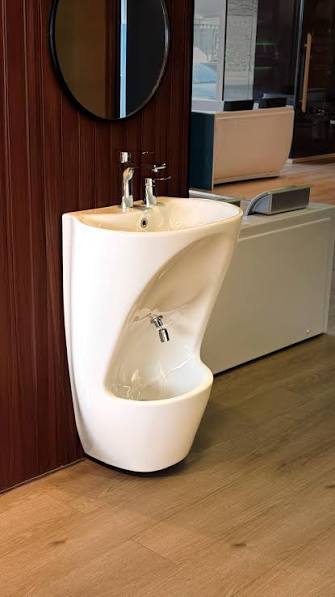
Small Bathroom Basin: Tips for Easy Installation and Long-Term Maintenance
Installing a basin in a compact bathroom requires careful planning, accurate measurements, and attention to plumbing details. The right basin can improve everyday convenience, make better use of limited space, and complement the bathroom’s overall design. However, even a high-quality fixture may develop problems if it is installed incorrectly or maintained without following the manufacturer’s instructions.
When selecting a Small Bathroom Basin, homeowners should consider its dimensions, mounting style, material, and compatibility with existing plumbing. Planning these details before installation can help reduce unexpected expenses and make future maintenance easier. With the right preparation and a consistent care routine, a small basin can remain functional and attractive for years.
1. Choose the Right Basin Before Installation
The first step is selecting a basin that suits the available space and your household’s needs. A compact design should provide enough room for comfortable handwashing without obstructing nearby fixtures or restricting movement.
Several installation styles are suitable for small bathrooms:
- Wall-mounted basins: These leave the floor beneath the basin open, helping create a spacious appearance and simplifying floor cleaning.
- Countertop basins: These sit on a vanity or counter and can provide a contemporary look.
- Corner basins: These make use of otherwise underused corners in narrow bathrooms.
- Pedestal basins: These conceal some plumbing components and suit traditional or transitional interiors.
- Vanity basins: These combine the washing area with storage for toiletries and bathroom essentials.
Before purchasing, review the manufacturer’s technical drawings and installation instructions. Confirm the basin’s width, depth, height, weight, drain position, and faucet requirements.
Choosing a model that fits the existing layout can reduce the need for plumbing alterations and additional installation work.
2. Measure the Installation Area Accurately
Accurate measurements help prevent common installation problems, including restricted access, poor faucet alignment, and insufficient clearance around the basin.
Measure the available wall or countertop width, the maximum depth, and the distance between the proposed basin location and nearby fixtures. Remember to account for doors, shower enclosures, toilets, cabinets, and towel holders.
For wall-mounted models, identify the appropriate installation height and check whether the wall can support the basin safely. For countertop models, measure the available surface and confirm that the basin, faucet, and surrounding accessories will fit comfortably.
It is also important to inspect the existing water supply and drainage positions. A basin may fit the room but require additional plumbing work if its connections do not align with the current system.
Practical tip: Keep the product specification sheet available throughout the installation process. It can help the installer verify dimensions, mounting points, and connection requirements before drilling or cutting any surfaces.
3. Prepare the Plumbing Connections
Proper plumbing preparation helps reduce the risk of leaks, slow drainage, and installation delays.
Before removing an existing basin or connecting a new one, the water supply should be shut off where applicable. If replacing an old fixture, drain the remaining water and disconnect the plumbing carefully.
Inspect the water supply lines, drainpipe, shutoff valves, and waste connections. Worn or damaged components may need replacement before the new basin is installed.
Check the following items before proceeding:
- The water supply connections are compatible with the selected faucet.
- The drain outlet matches the basin’s waste fitting.
- The trap and drainage pipe can be connected without unnecessary strain.
- The plumbing arrangement allows access for future repairs.
- All fittings are suitable for the intended installation.
Do not force misaligned pipes or fittings into position. Incorrect connections can lead to leaks and place unnecessary stress on the basin or plumbing components.
For complicated plumbing work, consult a qualified plumber to ensure that the installation complies with local requirements.
4. Install the Basin According to Its Mounting Style
Different basin designs require different installation methods. Following the manufacturer’s instructions is essential for a secure fit and reliable performance.
Installing a Wall-Mounted Basin
Wall-mounted basins require adequate structural support. The basin’s mounting points must align with suitable anchors, brackets, or reinforcement appropriate for the wall construction and product weight.
The installer should verify the mounting height, mark the fixing points, and confirm that the basin is level before completing the installation. Plumbing connections should remain accessible where possible.
Never rely on unsuitable wall anchors or assume that every wall can support a basin without reinforcement.
Installing a Countertop Basin
Countertop basins require a stable surface with appropriate openings for the drain and, where applicable, the faucet.
Measure and mark the cutouts according to the manufacturer’s template. Check that the basin sits evenly and that the countertop material can support its weight.
Use only the sealants and fixing methods recommended for the basin and countertop materials. Incorrect products may fail to create a reliable seal or could damage the surface.
Installing a Vanity Basin
Vanity basins may be integrated into a cabinet, fitted into a countertop, or placed above the counter. Ensure that the cabinet is level and stable before connecting the plumbing.
Allow enough room inside the vanity for the trap, supply lines, and maintenance access. Avoid positioning drawers or shelves where they interfere with the plumbing.
Installing a Corner Basin
Corner basins need careful alignment with both adjoining walls and the existing plumbing. Confirm that the faucet can be operated comfortably and that the basin does not interfere with the doorway or nearby fixtures.
Regardless of the installation style, check the basin’s stability and the condition of all connections before putting it into regular use.
5. Seal the Basin Correctly
Sealing helps prevent water from entering gaps between the basin and adjacent surfaces. Poor sealing can allow moisture to reach cabinetry, wall finishes, or the countertop.
Before applying sealant, clean and dry the surfaces according to the manufacturer’s instructions. Use a compatible bathroom-grade sealant where required, and follow the recommended application and curing times.
The correct sealing method depends on the basin’s design. Some installations rely on mechanical fixings or specific gaskets rather than a continuous bead of sealant.
Avoid covering areas that need to remain open for drainage, ventilation, or future servicing. If the product instructions specify a particular sealing arrangement, follow that guidance rather than applying sealant indiscriminately.
After installation, inspect the surrounding joints periodically. Cracked, detached, or discolored sealant may need attention, especially if moisture is collecting around the basin.
6. Check for Leaks Before Regular Use
Testing the installation is an important step that should not be skipped.
Once the connections have been completed and any sealant has cured as directed, restore the water supply and inspect the faucet connections. Run water into the basin and check the drain, waste fitting, and accessible pipe joints.
Look for moisture around the base, underneath the basin, and inside the vanity cabinet if one is present. Allow water to drain normally and check whether the basin empties without unusual delays.
If you notice a leak, loose fitting, persistent dripping, or slow drainage, identify and correct the cause before continuing regular use.
Do not overtighten fittings in an attempt to stop a leak. Excessive force can damage threads, seals, or other components. If the source of the problem is unclear, contact a qualified plumber.
7. Clean the Basin Regularly
Routine cleaning is one of the simplest ways to maintain a basin’s appearance and prevent stubborn residue from accumulating.
For everyday care, use a soft cloth or non-abrasive sponge with a cleaner suitable for the basin material. Rinse away cleaning products as directed and wipe the surface dry when appropriate.
Pay attention to areas where soap residue, toothpaste, and mineral deposits commonly collect, including the drain opening, faucet base, and edges of the bowl.
Avoid using abrasive pads or harsh chemicals unless the manufacturer specifically confirms that they are suitable for the surface. Certain cleaners can scratch finishes, damage sealants, or affect sensitive materials.
A consistent cleaning schedule is generally more effective than allowing deposits to build up and then relying on aggressive cleaning products.
8. Follow Material-Specific Maintenance Guidelines
The best maintenance routine depends on the basin’s material. Different surfaces respond differently to cleaning products, moisture, and accidental impacts.
Ceramic Basins
Ceramic basins usually have a smooth glazed surface that is straightforward to clean.
- Wipe the bowl regularly with a soft cloth.
- Use a non-abrasive cleaner approved for the glaze.
- Avoid dropping heavy objects into the basin.
- Inspect the surface for chips or cracks.
Although ceramic is suitable for everyday use, strong impacts can damage the glaze or crack the fixture. Damaged basins should be assessed promptly.
Solid-Surface Basins
Solid-surface basins are available in a variety of contemporary designs and finishes. Their maintenance requirements vary by product formulation.
- Follow the manufacturer’s approved cleaning method.
- Avoid harsh chemicals unless explicitly permitted.
- Use non-abrasive cleaning materials for routine care.
- Confirm the recommended repair method before attempting to correct scratches.
Some solid-surface products can be repaired or refinished, but the appropriate procedure depends on the material and finish.
Natural Stone Basins
Natural stone basins can feature distinctive patterns and textures, but some stones are sensitive to staining and acidic substances.
- Use a cleaner specifically approved for the stone type.
- Avoid acidic products on acid-sensitive materials such as marble.
- Wipe away substances that could stain the surface.
- Follow recommendations for sealing and resealing, if applicable.
Not all natural stone requires the same treatment. Confirm the specific care instructions before applying any product.
Glass Basins
Glass basins can develop visible water spots, soap marks, and fingerprints.
- Wipe the surface regularly with a soft cloth.
- Use a compatible glass or bathroom cleaner.
- Avoid abrasive pads that may scratch the finish.
- Handle heavy objects carefully around the basin.
Inspect the glass for chips, cracks, or other damage. If the basin is damaged, follow the manufacturer’s guidance about whether it can remain in use.
9. Prevent Drain Blockages
Slow drainage can make a small bathroom basin inconvenient to use. Hair, soap residue, toothpaste, and other debris can gradually accumulate around the waste fitting or inside the drainpipe.
To help prevent blockages, remove visible debris regularly and clean the drain opening using a method approved for the plumbing system.
If the basin drains slowly, inspect accessible components for buildup. A removable drain cover or waste fitting may need cleaning, depending on the design.
Avoid repeatedly pouring aggressive drain-cleaning chemicals into the plumbing without checking their compatibility with the pipes, fittings, and basin materials. Some products can damage components or create safety hazards when used incorrectly.
Persistent blockages, recurring odors, or drainage problems affecting multiple fixtures may indicate a deeper plumbing issue. A qualified plumber can identify the cause and recommend an appropriate solution.
10. Inspect Faucets and Plumbing Fittings
The basin itself is only one part of the installation. Faucets, supply lines, waste fittings, and seals also require occasional inspection.
Check for dripping faucets, loose handles, corrosion, and moisture around accessible connections. A small leak can gradually damage vanity cabinets, flooring, or nearby wall finishes if left unaddressed.
Aerators may also accumulate mineral deposits, depending on local water conditions. If water flow becomes uneven, consult the faucet manufacturer’s instructions for cleaning the aerator safely.
Do not ignore changes in water pressure, unusual pipe noises, or recurring leaks. Addressing these issues early may prevent more extensive repairs.
During inspections, avoid applying excessive force to fittings or disturbing connections that are functioning correctly. Seek professional assistance when a repair requires specialized tools or plumbing knowledge.
11. Protect the Basin from Scratches and Impact Damage
Even durable basins can be damaged by heavy objects, unsuitable cleaning tools, or improper handling.
Avoid placing heavy metal containers, glass bottles, or sharp tools where they could fall into the bowl. Use appropriate storage trays for toiletries and keep frequently used items within easy reach.
When cleaning, choose materials that will not scratch the basin’s surface. Avoid using the basin as a work surface for tools or heavy bathroom accessories.
If the basin develops a chip, crack, or visible structural damage, assess the problem promptly. Surface damage may sometimes be repairable, depending on the material and location, but a damaged fixture should not automatically be assumed safe to continue using.
Following the manufacturer’s repair recommendations helps prevent unsuitable repair products from making the damage worse.
12. Maintain the Sealant and Surrounding Surfaces
The area around a basin can be vulnerable to moisture, especially where the fixture meets a wall, countertop, or vanity.
Inspect these joints periodically for gaps, peeling sealant, discoloration, and signs of water damage. Check the surrounding countertop and cabinet for swelling, soft spots, or persistent dampness.
If resealing is necessary, remove failed sealant using a method suitable for the surface. Clean and dry the area thoroughly before applying a compatible replacement product.
Do not simply apply a new layer over damaged or mold-affected sealant without preparing the surface correctly. Follow the product instructions and allow the sealant to cure fully before exposing it to water.
Good ventilation also helps manage moisture in the bathroom. Use an appropriate exhaust fan or ventilation system to reduce persistent humidity and protect surrounding finishes.
13. Make Future Repairs Easier with Accessible Plumbing
A basin that is easy to service can save time and reduce disruption when maintenance is required.
During installation, avoid unnecessarily enclosing all plumbing connections behind permanent structures. Where practical, leave access to shutoff valves, drain fittings, and other components that may need inspection.
For vanity basins, check that drawers and shelves do not prevent access to the trap or supply lines. For wall-mounted models, use an installation arrangement that meets the manufacturer’s support requirements while allowing appropriate servicing.
Keep product documentation, warranty information, and details of replacement fittings in a convenient place. Knowing the model and the correct component specifications can simplify future repairs.
If you are renovating a bathroom, consider the long-term availability of compatible faucets, waste fittings, and other replacement parts before purchasing a specialized basin.
14. Common Installation and Maintenance Mistakes to Avoid
Several avoidable mistakes can reduce a basin’s performance or increase maintenance costs.
Choosing the wrong dimensions: A basin that extends too far into the room may obstruct movement, while an undersized bowl may be inconvenient to use.
Ignoring wall support: Wall-mounted basins need a suitable fixing system designed for the wall construction and fixture weight.
Using incompatible sealant: The wrong sealing product may fail to adhere properly or damage certain surfaces.
Overtightening connections: Excessive force can damage threads, gaskets, and fittings.
Skipping leak tests: Small leaks may remain unnoticed until they damage cabinetry or flooring.
Using unsuitable cleaners: Harsh chemicals and abrasive tools can affect finishes and sealants.
Ignoring slow drainage: Persistent drainage problems can worsen if debris or plumbing faults are not addressed.
Neglecting routine inspections: Small leaks, loose fittings, and failing sealant are easier to address when identified early.
Avoiding these mistakes supports a more reliable installation and helps preserve the basin’s condition.
15. Create a Simple Long-Term Maintenance Schedule
A basic maintenance schedule makes it easier to keep the basin clean and identify developing problems.
| Frequency | Recommended task |
|---|---|
| Daily or as needed | Remove visible residue and wipe the basin surface |
| Weekly | Clean the bowl, faucet, and drain opening |
| Monthly | Inspect accessible plumbing connections and look for leaks |
| Every few months | Check sealant, drainage performance, and surrounding surfaces |
| As recommended by the manufacturer | Apply stone care products, renew protective treatments, or perform specialized maintenance |
The exact schedule depends on how frequently the bathroom is used, the basin material, water quality, and manufacturer guidance.
A guest bathroom may need less frequent cleaning than a shared family bathroom. Similarly, a natural stone basin may require additional care compared with a glazed ceramic model.
Adjust the schedule to suit your conditions and investigate any unusual changes rather than waiting for the next routine inspection.
Conclusion
Easy installation and long-term maintenance begin with selecting a basin that fits the bathroom’s dimensions, plumbing arrangement, and daily requirements. Accurate measurements, suitable mounting hardware, compatible fittings, and careful sealing all contribute to a reliable installation.
After installation, regular cleaning, leak inspections, drain maintenance, and material-specific care help preserve the basin’s appearance and functionality. Homeowners should also monitor the surrounding sealant, countertop, cabinetry, and plumbing connections to identify problems before they become more serious.
By following the manufacturer’s instructions and arranging professional assistance when necessary, you can reduce avoidable repairs and maintain a comfortable, functional bathroom. A well-installed and properly maintained small basin can provide dependable everyday use while complementing the design of your home for years to come.